Sometimes the best toys are simple, cheap and don't take up too much space. It's even better when they're useful, too. I'd been slicing my loaves with knives, but the blades were never thin enough, no matter how sharp they were. The result was slightly pulled dough and less than perfect cuts.
Enter the lame. That's French for "blade", not English for "crappy". Basically a double-edged razor blade with a trendy green handle and matching cover so you don't remove fingers while searching for the thing in a drawer. Better yet, the blade is curved so it conforms to the round shape of the loaf. A couple of quick motions and the loaf is scored, ready to undergo interesting transformations in the oven. Look at that ear!
Correct proofing time is still critical, though. If the loaf is over-proofed, it will deflate like an unpowered pneumatic snowman when cut, then (hopefully) regain some of its bounce in the oven. Some bread types, like ciabatta, are inherently full of bubbles and air pockets, so the lame doesn't give clean, dramatic, eye-catching ears and gashes as it does with other formulas.
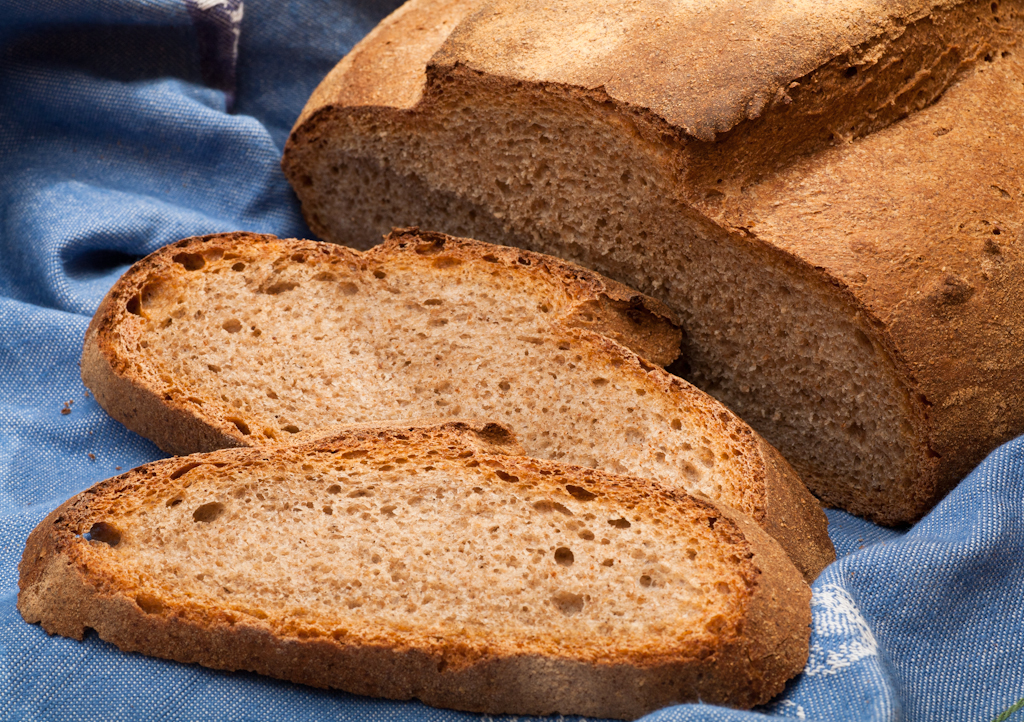
These loaves are mixed grain sourdough, slowly proofed in a freezing cold house (turning down the thermostat saves energy and as a bonus you get better tasting bread). I used a kneading process (as opposed to stretching and folding) because I wanted a solid country type loaf, the kind people living in cold houses eat (chewing hearty bread is as good a way to warm up as any). There was a bit of an "oops" when I dumped in organic blue corn meal instead of sprouted whole wheat (the bags are almost identical), but it turned out to be a happy accident, giving the loaf a sweeter finish than would wheat alone.
Showing posts with label baking. Show all posts
Monday, January 14, 2013
Friday, February 24, 2012
Big Cakes!
![]() |
| Aztec cake |
![]() |
| Special occasion cake |
Big. Like confection-covered ziggurats, they rise from the table, announcing that the Party is Here.
The special occasion cake is not edible, since it's finely crafted fondant wrapped around Styrofoam forms. Only the Styrofoam forms were given- all the shapes, colors glazes, flowers and piping were created in class. Veronica, our chef for the week, was in charge of designing the decoration and coordinating the teamwork needed to bring these fantasies to light.
The Aztec cake was baked last week, a mix of chocolate, roasted almonds and pepitas, a bit of cinnamon and some mild chili powder, kind of like Mexican hot chocolate turned into a cake. It was then frozen until this week's decorating work.
It took about five hours to color, shape, attach, pipe, adjust and finally present the cakes. Now we can admire one of them for weeks. The other will be sold and consumed somewhere. Hopefully we'll hear if they enjoyed the flavor.
Wednesday, February 22, 2012
Sourdough two ways
All of these started from the same dough. The two boules were steamed in a Dutch oven, then baked. The darker one was left in the Dutch oven, but with the lid removed during the last 20 minutes of baking. The other was removed after fifteen minutes of baking and finished on a pizza stone. I think the second method worked better. The two baguettes were done on a (what else?) baguette pan, with a bit of steam at the beginning of the baking process.
This dough uses unbleached white bread flour mixed with whole wheat flour and a bit of sprouted wheat flour - plus salt, sourdough starter and a bit of SAF yeast to give it a bit of a kick in the butt for a faster rise. Still, the sponge proofed for about five hours, the combined dough another three, and still more during benching and after shaping.
Friday, February 17, 2012
Baba Cakes
The blue flame glows in the dark room, swirling inside the funnel-shaped tuille for a few seconds until it fades.
Damn, that's impressive. Especially for a cupcake. But this isn't any ordinary cupcake. This is not something you give to your underage children. It's more of a dessert and cocktail blended into a single decadent entity.
It's more dynamic than a cupcake, too. Normally, you buy a cupcake, eat it and throw away the paper. These have a bit of showmanship. They get plated, someone pours hot rum into the cup, you pick it up and blow out the flame or wait for it to diminish. The rum sinks into the cake.
Take a bite. Raisin, rum, buttercream, dark sugar will unite to proclaim to your senses that this is far from your typical sugar bomb cupcake. It's more like an exotic visitor from Europe, a bit risque, even perhaps dangerous. There's rum in there! An alcoholic cupcake? Yes! Your visitor may be unusual, but he certainly knows how to entertain!
In fact, the cake is too rich for mass consumption that could lead to drunkenness. You won't wake up in bed with someone you hardly know who speaks with an accent. There could be a moment of rum-induced change of consciousness, but only a moment. There is also a built-in warning. If the tuille melts, you've added too much rum. Normally, this would only happen if you filled it twice. Not recommended, since you've exceeded the design parameters by 200%.
The rum soaks into the cake from the bottom of the tuille funnel, so you're not supposed to get a shot of pure rum. The rum melds with the raisin, sugar and baba dough, accented by the raisins in the buttercream. It's still a cupcake, not a shot glass after all. You could also heat a rum-sugar-water syrup and use that, for a reduced alcohol version.
Remember that this formula comes from an advanced baking class, so there's a lot going on. We had a team of four people doing things at the same time, so you can get together with friends to make these.
Baba Cakes
This is enough for about 30 rather large cupcakes or even more small ones.
Rum syrup
You can prepare this in advance.
yield 2 lb 3 oz
Ingredients
6 oz Brown sugar
14 oz oz Granulated sugar
1 oz Lemon juice
6 oz Water
8 oz Dark rum
0.1 oz Vanilla extract
Instructions
- Place the sugar, lemon juice and water in a small saucepan and cook over high heat until the sugar dissolves.
- Pour into a 4-cup heatproof stainless steel or other non-reactive pan and allow to cool.
- Add the rum and vanilla and set aside. Alternatively, you can heat the rum with the other ingredients in the first step to vaporize some of the alcohol.
yield: 14 oz
Prepare these in advance so they’re ready to go when the cakes are baked.
Ingredients
2. 4 oz Cake flour
1. 3 oz Dutch-processed cocoa powder
4.5 oz Confectioner’s sugar
2.3 oz butter, unsalted
3.5 oz egg whites, room temperature
0.1 oz vanilla extract
Instructions
- Line sheet pan(s) with silicone baking mats. Cut out 3” to 4” diameter circles from a manilla file folder.
- Mise en place: have shaping and cutting instruments ready: tapered dowels, round cutters.
- Sift together the cake flour and cocoa powder
- Cream together the butter and sugar with the paddle attachment, starting on low speed and increasing to medium speed until smooth, 5 minutes. Scrape down the bowl as needed.
- Add the egg whites and vanilla and mix on medium speed until fully incorporated. Scrape down the bowl as needed.
- Turn off the mixer and add the dry ingredients. Mix on low speed until incorporated. Do not overmix.
- Use an offset spatula to spread a very thin layer of tuile into the circular openings in the modified folder. Do not place more than four openings on a pan, since they will set up quickly and be difficult to form.
- Bake at 325°F until golden brown but still soft, 8-10 minutes. Watch carefully - the convection oven may be too hot and can overcook things!
- Remove the cutout template from the silicon mat.
- Using a cone-shaped item, form the tuiles into cone shapes. Reheat as necessary to shape (try to avoid this if you can).
- Reserve for later.
French raisin buttercream
This can be made while during the first proofing (bulk fermentation).
yield: 3 lbs 9 oz
Ingredients
6.2 oz raisins
2.3 oz rum
0.3 oz vanilla extract
6.2 oz eggs, whole, grade AA
6.2 oz egg yolks
14 oz granulated sugar
3.1 oz water
1 lb 2.7 oz butter, unsalted
Instructions
- Place the raisins in just enough rum to completely cover them, and purée until smooth. Add the vanilla extract and set aside. If you gently heat this mixture, you can reduce the alcohol content.
- Whip eggs in mixer fitted with a whip attachment on high speed until light and fluffy, about 5 minutes.
- Combine sugar and water in heavy-bottomed saucepan and bring to a boil. Stir to dissolve the sugar, then stop stirring. Heat until the mixture reaches 240°F (soft-ball stage).
- Slowly pour the hot sugar syrup into the eggs while whipping on medium speed. Continue to whip until cool.
- Gradually add the butter, beating until incorporated after each addition and scraping down the sides of the bowl as necessary.
- Blend in rum/vanila/raisin mixture.
- Store covered under refrigeration until needed.
Baba Cake
Yield: 2 lb 14.5 oz (46.5 oz)
Ingredients
1 oz lemon zest (about 1 oz per lemon)
1oz dark rum
13 oz Milk, whole (1/2 gallon)
0.9 oz Brown sugar
0.9 oz Granulated sugar
1.2 oz SAF yeast
8 oz Eggs, grade AA
1 lb 3 oz A.P. Flour
0.1 oz Kosher salt
6 oz Unsalted butter
Instructions
- Pre heat proofer. Line pans with paper inserts. Pre heat oven to 375° when dough is put into pans.
- Instructions
- Combine the lemon zest and rum in a small bowl, bring just to a simmer and set aside.
- Heat the milk to 115°F (46°C) and then pour it into the bowl of an electric mixer fitted with the paddle attachment. Stir in the yeast and sugars.
- With the mixer on low speed, first add the eggs, then the flour, salt, and butter. Raise the speed to medium-high and beat for 5 minutes.
- Scrape down the bowl and beater to form the dough into a loose ball. It will be very soft.
- Cover the bowl with a damp towel and allow it to proof until doubled in size, about 1 hour.
- Drain the zest (empty the rum remaining into the prepared syrup), fold into the dough with a spatula.
- Place the cupcake paper on a scale and add 1-½ ounces of dough to each cake, then place the cups into a cupcake pan.
- Cover the pan with a damp towel, and proof until the dough reaches halfway to the top of of the pan, 30 minutes in a proofer. You want to leave room at the top for the buttercream, and the cakes will rise during baking.
- Meanwhile, preheat the oven to 375°F (190°C). Bake the cakes for 15-20 minutes, or until a toothpick comes out clean. Start checking them after 12 minutes, in case your oven runs hot.
- Remove cakes from cake pan and place on a cooling rack (keep the paper wrappers on them). Allow to cool a bit so they’ll be easier to cut.
- Cut out a conical shape in the center of each cake with a paring knife, and insert a tuile into each cake.
- Pour the rum syrup very slowly onto the slightly warm cakes, allowing it all to soak in thoroughly. Amazingly, the liquid will be absorbed into the cake, and will take more syrup than you would think. If you want drier cakes, cut the syrup recipe down by half.
- Pipe buttercream around each tuile with a star tip, covering any ragged edges created when cutting into the cake.
Plating
- If the guest is a minor, give him a Newman O. These tricks aren’t for kids.
- Place the baba cakes on plates.
- Heat a small quantity of dark rum (like Zara) in a pan with a pouring spout. Don’t get it hot - you just need it warm enough to volatilize the alcohol. It could ignite if you get it too hot, and that would be bad. Throw a wet towel over it to extinguish and set it aside to cool.
- Holding it away from your body, light the warm rum. For better effect, do this tableside.
- Carefully pour the flaming rum into the tuiles, not too much. This is more for the flame effect than anything, and remember that there’s already rum syrup in the cakes. If you pour too much rum, the tuilles will collapse due to the moisture - consider it a built-in warning.
Wednesday, February 8, 2012
Baba-loooo!
My assignment: cupcakes. Forty-eight of them, all identical. This, my first task as chef for advanced baking, lands me with something I almost never eat. Cupcakes. Often sugar bombs, rarely containing enough chocolate, these things were inflicted on me as a child, to the point where I developed a real aversion to the things. So, my mission impossible is to take something I've eaten only rarely and transform it into something I will love, that people will rave about, that perhaps other cupcake agnostics such as myself will find good enough to redeem these things in their eyes.
So, I started with an idea. Not so sweet. It can't be savory because then it falls into the black hole of biscuitry, never to escape. But what if it were more European than American. Based on something un-cupcake like. Baba au rhum, for example.
Baba au rhum, first of all, is yeasted. That makes it similar to kugelhopf or any other rich bread. More in my territory that sweet cakes. Then the cooked bread gets dosed with rum syrup. If we were in Europe instead of a community college still firmly under the yoke of prohibition, it would get a final dousing of pure rum. So, a bit of raisin frosting, a cup to hold some form of liquid, probably rum syrup that's been simmered to evaporate its alcohol. Of course, if some of these things did manage to escape the bounds of ARC, someone could conceivably heat a bit of rum, flame it, pour it in the cup, blow out the flame, drink, then devour the rum-soaked cake. Sounds good to me.
The firs' thing to do was test the recipe. Then put abitta rum in there. Taste. Needa bit more. Not sweet enuf. Make rum syrup. Too sweet. Slosh a bitta rum on. Yeah, that's tasty. Wait til the real thing is made with the raisin frosting and cup thing. For now, not a bad thing at all. Adultz only cuz thazalotta rum. Juzza itty bitty cakcup s'all I ate. S'all offizer, I dina drink a drop!
I think overall the dough formula works. With the sweeter frosting and syrup, this will take cupcakes into new territory. Not just for kids any more, silly rabbit!
Thursday, February 2, 2012
Bagels, Mark II
They're back. Chewier, seedier and shinier than before. They've got poppy, sesame, kala jeera, cumin, nigella, garlic, and fennel pollen. Not all on the same bagel, though. That would be overkill.
This time, more proofing, more gluten, less water for better chew. Not so much gluten that it's like chewing on a rubber band, but enough to know that these are bagels, not dinner rolls.
The stiffer, higher gluten formula also allows rolling longer spindles which in turn make bigger holes. Unlike donuts, bagels are rolled then joined, so they never had anything in the center. Just air.
This time, the formula went like this:
SAF yeast: 0.6%
Water: 55%
Kosher or sea salt: 1.9%
Vegetable oil: 3.8%
Dry malt: 2.5%
Bread flour: 100%
Vita-wheat gluten flour 5%
This is a baker's formula, where the flour is always 100% and the other ingredients are in relation to it. In other words, if you had 1 lb (or 500 g) of flour you would just do the math to figure out the other ingredients based on their ratio to the flour. Yeah, that can sound a bit like rocket science, but it's not. Just a day in the life of a baker, actually.
Adding more of the gluten flour will increase chewiness, but reduce workability. Use this flour pure and you'll have something very similar to a ball of rubber that will probably end up in the trash. The idea is to find the perfect level of chewiness. These bagels could be a bit more chewy, so maybe 8% next time?
Once you have the dough, let it proof for at least an hour. This batch proofed around five hours at 65°F - but 18 hours at 50° would probably work, too.
Once proofed, the dough gets cut into 3 - 1/2 ounce portions, then rolled into spindle shapes. Cross the ends over each other and roll to seal using three fingers.
The now-bagel shaped objects proof another 15-20 minutes, while you put some baking soda into a large quantity of water and bring it to a boil. This is also a good time to heat your oven to 425°F.
The bagels go in the boiling water. This time, they sank and then rose to the surface. Too dense and they'll stay on the bottom; less dense and they'll float from the beginning. They just stay there long enough to puff up a bit, then out to drain.
Once boiled, they're placed on a sheet pan lined with parchment paper and dusted with whatever kinds of seeds or toppings you like, then off to the oven. In about 15-20 minutes, they'll be browned and ready to come out.
The nice thing is that, despite the seemingly complicated steps, bagels aren't that hard to make, and they're a lot quicker to produce than artisan bread... unless you want to mix techniques. But that will be another subject entirely.
Saturday, January 28, 2012
Bagels!
After an initial fiasco involving too much vital wheat gluten, I started over. Bagels, according to the formula given out in class, only need to proof for an hour after the dough is mixed. Then they're shaped, proofed another 30 minutes, boiled in alkaline water, topped and baked.
Much faster than artisanal bread, but would they be as good as the bagels I ate when I was little? Chewy, shiny, crusty things with a unique flavor unequaled by any mere bread. Things worth a special trip to Pasadena, worth enduring the interminable, endless time in the cosmetics department with my mother that would inevitably follow my bagel bribe.
So, I mixed water, salt, SAF yeast, a bit of vegetable oil. Kneaded well to develop the gluten, and placed the dough in a bowl to proof.
An hour later, time to boil some water with a fair amount of baking soda added and pre-heat the oven.
After proofing, the dough was spongy and seemed ready to go, so it got snipped into 3-1/2 ounce portions, rolled into long, spindly shapes and joined into rings with a deft three finger rolling technique.
Thirty minutes more proofing, then into the boiling water for a few minutes. In the water, the bagels puff up and develop a bit of a crustiness - all within a couple of minutes. They're still pale, a light tan off-white - not exactly appetizing, but they're starting to look like bagels.
Out of the water, drip dry, then onto a parchment lined sheet pan. Sprinkle with cumin seeds, sesame, salt, garlic... No poppy seeds. Put them on the list if I'm going to be serious about this bagel thing.
Toppings on, into the oven. I peeped through the door. The bagels began to take on a golden hue, darker, darker... Stop. In about twenty minutes, they were dark enough.
Out they came into the light of day to sit on a cooling rack. They smelled like bagels, but lacked the sheen of my childhood memories.
Now for the wait. The bagels would only develop their full flavor when completely cooled.
Finally they were cool enough (or almost) to taste. Picking one up, I noticed that it was much more springy than my dense childhood friends. I took a bite, worried that it would be more dinner roll than bagel. Not to worry. The necessary chewiness was not lacking. They weren't as chewy as my memories dictated, but they were a long way from being mere bagel-shaped dinner rolls. Not bad, even if they didn't zap me back to Stottlemeyer's Deli decades in the past.
In the future, I'll try a bit of vital wheat gluten mixed with bread flour to boost the chewiness, hopefully with that bit of malt that the formula called for but I don't have. I'm afraid that shiny, thick crust may have been due to the use of lye (sodium hydroxide) in the water instead of baking soda. Still, better not to burn holes in my skin just for a fistful of bagels, so I'll stick with the sodium bicarbonate for now.
If I can get the chewiness and flavor right, maybe I can time warp myself back to Stottlemeyer's Deli or Brookln Bagel Bakery, where I would eagerly scan the bins for my favorites: raisin, garlic, salt, sesame or all of the above. I also liked them plain, just the chewy dough and caramelized crust, pure bagel. So, for now I have some tasty rolls, too tender and soft to fully qualify as definitively bagels yet not altogether lacking in bagelness. A work in progress...
Sunday, January 22, 2012
80 ingredients. Chemistry degree preferred.
Someone gave us some "bear claw coffee cake". Someone, I suspect, who does not know I'd rather not stick the output of several chemical factories in my face and call it food.
The package contained one gooey, sticky, and very puffy long roll liberally decorated with some kind of icing. It was light, as it should be with both yeast and chemical leavening agents working to puff it up. It was also light in the flavor department, lacking that rich, buttery, flaky quality punctuated by a bit of almond crunch that people used to associate with bear claws.
I imagine that anyone buying these things is not too worried about flavor. Nor are they likely worried about toes.
Bear claws normally have toes. They're just cuts in the dough, but still. This thing had none. Not only was it chemical-laden, it was toeless, too. Maybe adding "coffee cake" to the name eliminates the need for toes, but still. Couldn't they call it "almond coffee cake" and skip the ursine references altogether?
I'm starting to think that "coffee cake" is a synonym for "flavorless things dunked in coffee so you don't know they're flavorless." Therefore, anything with this term in its name is automatically suspect. But that's another topic. Back on subject!
A toeless bear claw! Imagine! Someone actually bought the thing. What were they thinking?
Wait. Many people must buy the things, or they wouldn't be there in the supermarket, arriving daily to sully the image of Danish pastries. No toes, little flavor, wrong texture, yet purchased no doubt by the thousands by people across the nation whose taste buds have gone on permanent holiday.
Really, though. What's with this toeless thing? This is America, dammit! We could put a man on the Moon, but we can't put toes in our bear claws? What has happened to our once-great nation? Can nobody find a cost-effective way of toeing bear claws in a factory?
Have we degenerated so much that we don't even know that bear claws have toes? Has this puffy toeless tribute to chemically-dependent foodstuffs become the new bear claw norm? Have we become a nation of sheep, passively herded by multinational agro-corporations in whatever culinary direction they choose?
Does no supermarket shopper remember that these things were invented by chefs proud of their craft, who carefully crafted simple, natural ingredients into something truly worthy of eating?
Yet, some do remember. The craft of Danish pastry is still taught in cooking schools. My textbooks list eleven or thirteen ingredients for bear claws. Their formula uses laminated, or folded dough to create zillions of layers alternating butter and yeast-leavened flour. Well, maybe only about 512 layers, but still that's a lot. This is done by sealing a block of butter into the dough and then folding, folding, folding. Each fold creates more layers - the same technique used for croissants. The result is heaven. Puffy sheets of dough that practically float in the air, backed by a rich, buttery flavor. Real almonds, butter, sugar and egg for the filling.
Bear claws I would eat:
(yes, they would have "toes"!)
bread flour
sugar
instant dry yeast
salt
butter
eggs
milk
almonds (almond paste)
cake flour
apricot glaze
(optional: almond extract, vanilla extract)
These are the ingredients used in the industrial strength bear claw coffee cakes
These things had eighty ingredients, unless I missed a repeating ingredient that threw off the count.
Enriched bleached wheat flour
(wheat flour, niacin, iron, thiamine mononitrate, riboflavin, folic acid)
Water
Sugar
Palm oil
Almonds
Whole eggs
Yeast (how does the yeast survive in all this stuff?)
Soybean oil
Dextrose
Mono and diglycerides
Invert sugar
salt
canola oil
whey
wheat gluten
Enriched wheat flour
(niacin, iron, thiamine mononitrate, riboflavin, folic acid. Again.)
Corn flour
Guar gum
Artificial flavor
potassium sorbate
dried egg white
sodium steryl lactylate
natural flavor
Bleached enriched wheat flour
(niacin, reduced iron, thiamine mononitrate, riboflavin, folic acid. Again.)
Calcium propionate
Leavening
(sodium aluminum phosphate, baking soda, aluminum sulfate, fumaric acid, monocalcium phosphate, sodium acid pyrophosphate)
Dried egg yolk
Calcium disodium EDTA
Annatto
Vitamin A palmitate
Sodium bicarbonate
Sodium acid pyrophosphate
calcium sulfate
polysorbate 60
Citric acid
Xanthan gum
Wheat starch
Silicon dioxide (A.K.A. sand)
Sorbitan monostearate
soy lecithin
Cornstarch
Dried whole egg (already got the yolk & white, so why not the whole thing this time?)
Modified food starch
Enzyme monocalcium phosphate
Ammonium sulfate
Azodicarbonamide (ADA)
Beta carotene
Datem
High fructose corn syrup (had to be in here somewhere, didn't it?)
Stearic acid
pectin
caramel color
(contains sufites, Water, Sodium benzoate, Citric acid) No actual caramel was used, apparently.
Nonfat milk powder
Vitamin E
Vegetable shortening
(palm, canola and/or soybean oil)
mono and diglycerides (can you ever have just one of these?)
polysorbate 60
TBHQ - preservative
agar
cellulose gum
ascorbic acid (good old vitamin C)
L-cysteine
natural and artificial flavor
sodium hexametaphosphate
sodium benzoate
propylene glycol (not to be confused with ethylene glycol)
mono and diesters of fatty acids with BHT as preservative (my favorite ingredient here, really sounds chemical, and there are preservatives for things that don't themselves sound very appealing!)
Calcium acetate.
Contains: Wheat, Milk, Soy, Egg, Almonds. (how did those things get in here?)
Tuesday, December 13, 2011
After the Scary Cake Test
This is it. The Cake of Doom. The Cake of Judgement. My grade depends in part on the perfect execution of this amalgam of sweet, sour and technically difficult. Scoring the cake is apparently like Olympic skating, where degree of difficulty comes into play somehow. I'll never know what points were good and which were bad; all I'll receive is a final grade for the class. I will have the satisfaction that comes from inventing something and managing to turn the idea into something not only edible, but enjoyable. If you don't count the stress involved with 25 people all writing little notes about every aspect of the oeuvre.
The idea came from a question: why don't cakes use seasonal fruit, so they taste fresh instead of fake? So what if you can't make this cake in June. That just makes it that much more worth waiting for. So, although there's a bit of orange marmelade (and it could also be a tangerine purée simple syrup), all the fruit flavor comes from fresh, mostly uncooked tangerines.
It's not too sweet, either. It's not supposed to be a rich, heavy thing, but a light fruity interlude before taking a brandy and a fine cigar and heading away from the table.
If you're brave enough to try all this, please keep your common sense. I already found one mistake that would have transformed the thing into a vanilla cake - so think things over before you start. The ingredients are more or less in the order they would be prepared. The Bavarian cream has to be done as one of the final steps just before assembling the cake, since it needs to chill to set. The genoise, chocolate wafer and buttercream can all be made in advance.
This will make two, six inch diameter cakes. I like small cakes; they seem more chic and European that way. I suppose it could also be modified to work in a square pan, although the corners would be tricky. To assemble, just read the assembly instructions and follow the diagram above. Then do it again, and again and again until it's all just a piece of cake.
Tangerine Dream Cake
Components per cake
- White chocolate for drizzling
- Swiss meringue buttercream, Dark Chocolate
- Orange genoise 2 pieces
- Orange (tangerine) Bavarian Cream
- Tangerine slices, seedless
- Simple syrup w/Cointreau (or equal)
- Orange marmelade
- Chocolate wafer (base) 1 piece
Cake assembly
- Spread orange marmelade on the chocolate wafer, very thin.
- Measure a piece of acetate so that it is just wide enough to cover the fruit layer, but leave the top layer of the cake exposed.
- Spread orange marmelade on top of the chocolate wafer.
- Place the chocolate wafer in a 6” charlotte ring.
- Spread tangerine-flavored syrup on top of one piece of the genoise, and place it on the wafer.
- Arrange tangerine slices around the perimeter, against the acetate, flat sides down.
- Fill with Bavarian cream to the tops of the tangerine slices.
- Add another layer of tangerine slices along the perimeter, rounded sides down (between the other slices)
- Fill just over the top of the tangerines with orange Bavarian cream.
- Spread flavored syrup on top and bottom of the other piece of the genoise, and place it on top of the buttercream.
- Chill until the Bavarian cream is completely set.
- Spread the chocolate buttercream over the top and sides of the cake.
- Carefully remove the acetate, and pipe buttercream to cover the lower, exposed, part of the cake. Decorate with crushed leftover pieces from the chocolate wafer mixed with a bit (careful!) of instant coffee.
- If it can be done without messing up the cake, place an acetate strip over the fruit layer, and place the cake in a refrigerator to chill and set the buttercream. If not, coat the tangerine slices on the sides with the apricot glaze.
Ingredients
- Sugar 3.75 oz
- Eggs 3 ea
- Yolks 3 ea
- Cake flour 4 oz
- Sugar 1/2 oz
- Butter, clarified, warm 1/2 oz
- Orange extract 1/2 tsp
- Tangerine zest 1/4 tsp
Two, 6” round cakes. ± 1 lb 2 oz
Pan preparation
Parchment on the bottom, very lightly grease the sides.
Baking
Scale 6 oz batter into a 6" cake round, bake about 20 minutes at 375°F.
Doneness
The cake will spring back when touched; the cake edges will just begin to pull away from the sides of the pan if the pan has been greased.
Instructions
- Heat sugar, eggs, yolks over bain-marie to 120° F, whisking constantly. Transfer to mixer, add orange extract, whip on medium speed until the foam is pale and thick, and increases 3 times in volume, and holds a ribbon.
- Sift flour twice with the sugar. Sift one quarter of the flour over the egg foam, fold in quickly and gently with a spatula, repeat three more times. Stop folding when the last portion of flour is not quite fully folded in.
- Fold a small amount of the batter (one spatula full) into the butter, then fold all the butter into the remaining batter.
- Divide batter into two cake pans, pan and bake immediately.
Ingredients:
- Unsalted butter, room temp. 4 oz
- Unsweetened cocoa powder 2 oz
- Granulated sugar 7 oz
- Eggs 2 ea
- Vanilla extract 0.2 oz
- A.P. flour 4 oz
- Salt 0.1 oz
- Water 0.3 oz
- Baking powder (very small amt) 0.1 oz
- Yield: makes two, 6” rounds 1 lb 5 oz
- Preheat an oven to 350°F. Line a sheet pan with parchment paper.
- Put the butter in a large saucepan and set over medium heat. Stir with the whisk just until the butter is melted.
- Remove the saucepan from the heat and add the cocoa powder. Whisk until the mixture is smooth and no lumps remain.
- Add the sugar and continue whisking until well blended.
- Let the mixture cool for 2 minutes.
- Add the eggs, water and vanilla and whisk until well blended.
- Add the flour and salt. Scrape down the sides of the bowl as needed.
- The batter will be fairly liquid. Scrape the batter into the prepared baking pan and spread evenly with an offset spatula. Spread it about 1/8 thick.
- Bake until a toothpick inserted into the wafer comes out clean, about 20 minutes.
- Cut the wafers into 6” rounds before completely cool (don't wait or they’ll crack). Mark the dough with an upside-down cake pan. Cut with a paring knife or small pizza cutter - or use a charlotte pan the same diameter as the cake pan.
- Let cool completely.
- Break up remainder and use as crumb decoration for lower part of cake.
- You can also crisp the cake up by putting it in a low (200° F) oven.
This is for dabbing into the cake to give it more flavor.
Ingredients
- Tangerine pulp 4 oz
- Granulated sugar 4 oz
- Yield 8 oz
- Place all ingredients in a stainless steel pan. Heat until mixture thickens.
- Remove from heat, strain through a chinois.
- Dab into genoise cake to give it moistness and flavor before assembling the cake.
Orange Chocolate Swiss Meringue Buttercream
This works with Italian meringue, too - just use the type you're most comfortable with.
Ingredients
- Egg whites 4 oz
- Cream of tartar 1/4 tsp
- Sugar 8 oz
- Vegetable shortening 2 oz
- Butter 12 oz
- Orange extract 1/4 tsp
- Chocolate, melted & cooled 4 oz
- Yield: 1 lb 14 oz
- Place the egg whites and sugar in a stainless steel bowl on top of a bain-marie. Beat with a whip until the mixture reaches 120°F.
- Transfer the mixture to the bowl of a mixer, whip at high speed until stiff peaks form and the meringue cools to 80°F. This is now Swiss meringue, but it could be done with Italian meringue, too. At this point, either process would work - and the following steps will be the same.
- Little by little, add the soft butter and chocolate and continue to whip. Add each piece after the previous one has been incorporated. In the same way, whip in the shortening.
- Continue to whip until the buttercream is smooth.
Ingredients
- Clementine mandarins, whole 20 oz
- Yield, peeled (85%) 17 oz
- Peel mandarins.
- Separate slices
- Cut enough slices to go around cake in half, exposing inside of fruit. Place cut side of fruit against acetate when assembling cake.
- Reserve 8 slices per cake for decorating the top.
- Press remaining tangerine slices into Bavarian cream layer or eat them. If you peel as you go, there won't be a lot of tangerine left over.
The tangerine pulp was unstrained, so it would add a bit of texture to the Bavarian cream. This was part of getting more of a "real fruit" feel to the cake, although there's no reason the pulp could not be strained. I think there's more flavor this way, though.
Ingredients
- Gelatin, grains 1/4 oz
- Cold water 2 oz (5 T)
- Egg yolks 2 oz
- Sugar 2 oz
- Milk 4 oz
- Vanilla 1/4 tsp
- Orange extract 1/4 tsp
- Tangerine (mandarin) zest 1 tsp (or orange zest, or omit)
- Heavy cream 8 oz (1 cup)
- Mandarin purée 4 oz
- Yield: 1 qt 1 pt (48 oz)
- Soak the gelatin in the cold water. Make sure you stir it into the water; don't just dump it in or you'll get a strange floppy gelatin disc and some turbid-looking water instead of well-hydrated gelatin.
- Prepare the crème anglaise: Whip the egg yolks and sugar until thick and light.
- Scald the milk and slowly stir it into the egg yolk mixture, beating constantly.
- Cook the crème anglaise over a hot water bath, stirring constantly, until it thickens slightly. It should coat the back of a spoon, temperature 170°F. Don't get it hotter or it will curdle!
- Stir the gelatin sheets into the hot custard sauce until it is dissolved.
- Cool the custard sauce in the refrigerator or over crushed ice, stirring constantly to keep the mixture smooth.
- Whip the cream until it forms soft peaks. Do not over-whip.
- When the custard is very thick but not yet set, fold in the whipped cream. Custard should more or less hold its shape when dropped from a spoon.
- Add the tangerine purée. Do NOT add this to the hot milk/egg mixture, as the milk will curdle instantly. Poof! Ruined! Start over! So, don't do it. Instead, add the purée only after the milk has been tempered into the egg mixture!
- Spoon the mixture between the tangerines in the cake. Add to just cover the tangerines, leaving a bit over 1/8” over the fruit. Shake the cake gently to settle the Bavarian cream.
This is for coating the tangerine slices to preserve them a bit better and make them glossy. It could presumably be done with strained tangerine jam or jelly, if you could find it instead of apricot glaze. You can also mix apricot jam and simple syrup, although it will be clearer if you strain the jam first.
Ingredients
- Commercial apricot glaze 1 oz
- Water 1 oz
- Yield 2 oz
Dilute glaze in water, bring to a simmer, whisking to prevent lumps.
Use warm, or at least while still somewhat liquid.
Wednesday, December 7, 2011
Before the Scary Cake Test
Tomorrow, my doom awaits. A cake must be made, to perfection. A cake perhaps never made since the dawn of time. My entire culinary future could rest on the successful completion of this dessert. Yes, that's stupid, but that's the way things are set up.
So, what to do while the stress mounts? Diligently study arcane tomes of cakery? Delve into the mysteries of gelatin-stabilized whipped cream and créme anglaise?
I think not.
Pan sear some excellent grass-fed beef, with a flavor of the fresh shoots of springtime, grassy, exuberant, bold. Add some lazy man's Bordelaise sauce - a pan sauce with a medium-dark roux, wine, fond, onions, celery, salt. A bit of tarragon-flavored beurre composé. A trio of artisan cheeses: Valsetz chevre, Twig Farms washed rind, Saint Nectaire. A wine worthy of the task: a Merlot by Solune in the Sierra foothills. Some sourdough baguettes an hour from the oven. Start with a fruity Garnacha for the first toast.
Add music. Sing in Portuguese and Spanish. Berekere, Barabare, O Vento, Depois os temporais, Los Ejes de mi Carreta, A Samba me cantou, Destillando Amor... Dance with the cat, too (he's amused).
Lie down and watch the lights of the room spin and twirl.
Ready?
Perhaps not, but at least relaxed. Tomorrow is a good day to die!
Monday, November 28, 2011
Pies: One required. One fun.
I had to bake a pie for Thanksgiving, as part of a class. A complicated cake wasn't enough; there had to be a pie, too. So, I made my favorite French pie: Tarte Tatin. Then I made the required Good Old American Apple Pie (also a favorite).
So here they are, with a posting date before class. Just in case someone says that I missed another deadline. They're often rather vague and confusing. Late work isn't worth sweetened condensed armadillo spit, so it's best to turn in something crappy on time than something well done a bit later.
I also made a banana/ginger hand pie. But that's really outside the scope of this class.
J'en ai marre! La plupart des gâteaux faits dans ma classe contiennent des noix, des noisettes, des saloperies d'allergènes divers... et je ne peux pas les manger après avoir passé un temps fou à les préparer!
Thursday, November 24, 2011
Thanksgiving!
So, you were expecting photos of roast bird and apple pie? The bird looks like a big, skin-covered sausage when it comes out of the oven. Sliced, it's tender slabs of meat veined with green flavor-enhancing herbs. There was no cranberry sauce - the berries went into the rice, and were very happy there. No stuffing, either. Just tangy, sweet-sour yams that complimented the turkey and rice to perfection.
A thanksgiving menu
Food
Cranberry rice medley
Citrus-baked yams
Boneless turkey breast roast
Tangerine Dream cake
Sweet Potato Pie
Whole wheat country loaf au levain
Wine
Pinot Gris Reserve | Jean Albrecht '10
Grüner Veltliner | hugl '10
The turkey
- Bone the turkey, separating the breasts from the tenders. Reserve the drumsticks, use the thighs and wings for sausage meat, make stock with the neck & bones. Save as much skin as possible.
- Brine the turkey breasts with some rosemary sprigs overnight.
- Puree celery and parsley. Add lemon juice. Add room temperature butter and puree until you have a gooey mess with butter and herbs. Place this in a bowl and rub all over the turkey breasts and tenders.
- Place the reserved skin on a cutting board, place the breasts & tenders on top, pull the skin around over the meat and truss. We didn't have enough skin to completely cover the meat, but it's not a problem as long since the exposed meat will be placed on the bottom in the braising liquid.
- Place in a ceramic or other non-reactive baking dish, add whatever liquid is left from the celery/parsley/lemon mixture, then add some turkey stock made from the bones.
- Roast at 360° for about 90 minutes.
- Let rest, then carve. Done. Serve with some of the braising liquid and pomegranate seeds as a garnish.
The Rice
Simple. Salt. Brown rice. Wild rice. Fresh whole cranberries. Unsalted turkey stock.
Put all this in a pan and simmer for about an hour on very low heat. We used brown basmati. Don't use white rice since it needs a lot less time to cook than wild rice and will turn to mush.
The yams...
I'm not sure what's in these, except lemon juice and simple syrup flavored with nutmeg, lemon juice and zest. They're steamed, mashed, the syrup goes over the top and they're baked.
Tangerine Dream cake
The base is a dark chocolate wafer, then orange marmelade, then tangerine genoise flavored with simple syrup infused with pureed tangerine, orange and vanilla extract. Then tangerine Bavarian cream. Then another layer of the genoise. Cover the whole thing with chocolate Swiss meringue buttercream and garnish with tangerine wedges.
I didn't make the sweet potato pie (a friend brought it), so I can't say much about it except that it was excellent.
Saturday, November 19, 2011
The Big Healthy
Whole grain wheat. Buckwheat. Sunflower seeds. Sourdough starter. Slow proofing. All this makes for some interesting and healthy bread.
First step, the night before: mix some whole wheat flour with some buckwheat flour, add some sourdough starter and water, but no salt. Mix well, and place in the refrigerator.
The next day, roast some sunflower seeds, add to the mix along with more whole wheat flour, a bit of bread flour, some salt and more water. Knead well, until you can do a windowpane test with the dough - stretch it into a flat sheet between your fingers without tearing. The dough should be a bit sticky and supple. Don't worry about the soft, sticky dough - as long as it more or less holds its shape as a ball (instead of collapsing/melting) you should be fine.
Set the thing in a bowl to proof, until it doubles in volume.
Punch down, form into a ball , turn out into a basket lined with a couche well coated in flour with the pretty side down. Let it proof some more.
When it looks large and fluffy, transfer it to a cornmeal coated peel and slide it onto a hot stone in an oven preheated to 500°F. Carefully squirt some water on the sides of the oven, or if you want to be really careful, into a heavy-duty sheet pan. This creates steam that helps the loaf rise.
Bake about ten minutes at 500°F, then lower the heat to around 450°F and bake for approximately 40-45 minutes to develop a wonderful, thick crust. Watch the loaf occasionally to make sure it's not burning.
When it's ready - the interior will test about 205° F - place the loaf on a cooling rack. Eat it any time after it's cool.
This loaf, being whole grain and full of nuts, should taste great and give you lots of fiber and vitamins in the process. It's kind of like drinking a rich, dark beer compared to that light diet stuff.
Saturday, November 12, 2011
More sourdough: bâtard
There are probably too many bread photos up here now, but since I baked this loaf it might as well settle down here with all the others. Besides, gotta have some French bread if I'm studying French cooking techniques.
This is a lean dough - flour, water, salt, sourdough starter. Knead well, and don't add too much water. This is supposed to be a stiff dough, so tacky to the touch is good enough. Primary fermentation overnight in the refrigerator, then a warm-up on the bench, then shaped into balls and benched, then formed, proofed in a warm oven and baked.
This bread is better warm, eaten not too long after baking. It could be the weather, too - it's been a bit humid lately.
Friday, November 11, 2011
Sourdough Ciabatta
These take patience. Pure sourdough starter, a mix of whole wheat and unbleached bread flour. Some salt and water. The dough was mixed very wet by hand with a spatula, then immediately placed in the refrigerator for an overnight ultra slow proof and also to let any enzymes present munch on the whole wheat to develop more flavor. Then more proofing at cool room temperature in a bowl. Then stretched, proofed some more on the bench, then shaped, proofed some more at room temperature, then proofed some more at about 90° to speed things up. Finally, baked to an internal temperature of 96° C (205° F).
The initial dough is very, very wet. Like wet paste. Sticky, gooey, stringy. As the process moves forward, flour gets into the dough from the bench proofing, then when the loaves are shaped. The bread proofs on a couche to dry it out a bit more (funny word, but we're stuck with it). The end result is loaves that can't easily be picked up since without a lot of support they'd flow right out of your hands and on to the floor. However, all that moisture and stretching develops the gluten. The long proofing leads to happy yeast and lots of air bubbles in the bread that make it light and airy.
When the loaves go into the oven, they're almost pizza flat, but rise quickly. I'd rise quickly if I were in a 260° C (500° F) oven, too!
They're done in about 20-30 minutes, ready to eat in another 90. All bread needs to cool for a bunch of food science reasons, but the bottom line is that it has better texture and flavor after cooling than it does hot out of the oven.
Wednesday, November 9, 2011
It's Alive!
My parents mentioned a few months ago that they'd bought some sourdough starter for me from King Arthur Flour. They put it in a box and everyone pretty much forgot about it. Until we showed up, and there it was, still in the box. Unfed, untouched.
I gave it a sniff. Smelled like sourdough. So back in the box and away it went to Sacramento, where I watered it, fed it and waited. In a few hours, there were some bubbles. Then froth, and a good sourdough smell. Still alive!
This was the first bread from the new starter. It's made with bread flour, a bit of whole wheat flour, water, salt, the starter, some pâte fermentée (previously made up bread dough), and a good dose of sourdough starter. I did throw in a bit of SAF yeast for insurance, but much less than normal. This dough is well hydrated and a bit sticky. It's not so wet that it sticks to the bottom of the mixing bowl like ciabatta, but rather wet enough to be supple and velvety in the hands.
As soon as the dough was mixed, it went into the refrigerator for an overnight cold, slow proofing. Initial fermentation was then done on the counter as the dough warmed. Then it was benched, formed and baked in a 500° oven with a bit of initial steam.
It has a light sourdough flavor, probably because I could have proofed it longer but didn't have the time. Next time I make bread, the leftover uncooked dough from this batch will be used as pâte fermentée. That should give a bit more sourdough flavor and complexity.
Monday, October 10, 2011
New couche!
| proofing loaves in the couche |
| ciabatta, ready to eat |
Real bakers use couches. Not just on their babies, either*. A good couche is strong and a bit absorbent, keeping the loaves in shape yet allowing them to slowly lose moisture as they proof. For highly hydrated breads, this is a very good thing.
I'd been using an old cloth rice sack. Botan brand. Too thin to stand up and support the loaves, and since it's thin it couldn't do much in the absorption and wicking department, either.
Real baker's couches are linen. I thought they were cotton, but no. Linen. Untreated linen canvas. Hey, I'd seen this stuff at the art store. Untreated cotton was even on sale when I got there, so away I went.
The first thing I noticed was that the material was not exactly odor free. Untreated apparently does not mean washed and odor free. When I first gave it a quick rinse, the water was yellowish. So, no choice but to soak it in a pot with a bit of dishwashing detergent in it for about an hour. Then rinse, rinse, rinse some more until the fabric smelled of nothing at all. Success.
Let the couche dry, then lightly spray with oil, then dust with flour. Place a loaf of ciabatta dough near one end, fold the end up against the bread, then fold the other side of the couche up against the other side of the loaf. Add another loaf. Repeat until done.
If there was enough flour on the couche, the bread should come off without too much problem. Since this is ciabatta, it's very limp and sticky. It really wants to stick to the couche. Don't let it. That flour is all that stands between you and a sticky mass of dough plastered to the fabric.
With the help of a bench scraper, you can get the loaves off and onto a peel well coated with semolina flour. I prefer semolina to corn meal, since it doesn't have that crunch that separates it from the bread. It blends with the dough, but still allows a limp, sticky ciabatta loaf to slide off the peel onto the hot pizza stone.
This batch of bread came out just about perfect. Off-white crumb with good flavor (thanks to a biga prepared yesterday). Crispy crust. Large, open holes. Maybe I'm wrong, but the couche really seemed to help.
* French joke. Too long to explain.
Thursday, July 28, 2011
Whole grain bread
Whole grain bread isn't simple. The challenge is to make the bread taste so good that you don't even think about health benefits. It's a bit more challenging to make than bread made with unbleached white flour, but with a bit of help from Peter Reinhart, it's coming along well. I kind of bent or ignored half his advice and developed my own technique based on his theories (and mine).
The bread is made from two parts: a pâte fermentée that gets renewed as new bread is made, and a soaker. I decided to let the soaker ferment a bit as well and care for it like a sourdough starter. My soaker bubbles a little but appears to have no leavening quality at all. That's not what I'm looking for anyway - I want flavor, and I get the leavening by adding SAF Instant yeast in the final mix per Mr. Reinhart's advice.
I use either four ingredients: flour, water, salt, yeast - or five by adding dark rye flour - or six by adding buckwheat flour - or seven by adding flax seeds - or eight by putting sunflower seeds on top for a real multi-grain, complex symphony of cereal flavors. I've resisted adding sweeteners of any kind, not even agave. The goal is to let all the interplay of fermentation, whole grains and the baking process bring out the flavors inherent in the flour, without resorting to adding other elements.
This dough works better for large loaves, since this allows the crust to get thoroughly caramelized without overcooking and drying the interior. Although regular pains come out fine, they just don't have the same thick, crunchy crust.
The flour is 100% hard red winter wheat from Community Grains. The only place to get it, unfortunately, is at Whole Paycheck in the bulk section. The last time I was there, I cleaned out the bin and didn't even get five pounds of flour!
Wednesday, February 2, 2011
Freckles and Ears!
| Pain au levain, with a nice "ear" |
| Pain au levain |
| Sourdough boule detail. Nice "freckles" |
I don't know the official word for freckles. It's just what I call the little spots or mottling that was on every piece of sourdough bread, but for some reason did not happen on my bread. Now it seems that the reason was more the result of shaping technique than anything else. The upper surface of the loaf has to be stretched during shaping - but this also has to do with the wetness of the dough and the amount of gluten developed.
Ears, on the other hand, are where the crust rises up in the oven after scoring. Since they're out in the open with swirling hot air around them, they crisp up nicely and caramelize, adding more flavor to the bread.
These loaves use 100% sourdough starter, with no commercial yeast. They have a long fermentation time (pétrissage lente), about 24 hours between primary fermentation, shaping and proofing. During this time, the bread develops a lot of flavor, and the crumb is a nice tan color instead of white or cream.
I'm baking with a tiny electric convection oven. It does a decent job on bread since it's small and the steam from the bottom pan can fill the oven. The crust is crunchy and well caramelized, the crumb complex and interesting.
Considering the typically boring excuses for "European Style" bread at the local supermarkets, I really wonder if they know what they're doing. After all, they are supposed to have real, professional bread ovens (I imagine deck ovens with steam injection, but this probably varies from store to store). I remember buying really excellent bread at some stores when they first opened, but the quality has faded to a pale shadow of its former self. Did some maître boulanger come in, get them started, then leave? How do they decide who to hire for bread making duties? I almost hesitate to ask.
Thursday, January 27, 2011
Biscuits & Muffins
Orange-cherry muffins
My baking class starts with breads, then moves on to croissants, then puff pastry, then I forgot what but saves muffins for near the end of the half-semester. That doesn't stop me from playing with them, especially when my wife says she'd really like a muffin or two.
There's still more work to be done with these. Maybe some brown sugar mixed in, maybe pre-soak the dried cherries in Kirschwasser... Maybe cut back on the orange zest? Hopefully I'll have them figured out by the time I have to master them for class.
Subscribe to:
Posts (Atom)